Sunday, 31 January 2016

Treasured Memories

Hello Friends!
Today I have a layout to share with you all! It's my first one, and so I was very excited about what to add & how to proceed. Incorporating lots of patterned paper scraps, stamps, acrylics, inks & few other elements, here is my layout


Design is inspired by ICR Story scrappers this month's challenge. Starting with a pink patterned sheet stamped musical notes using Bo Bunny "It's written" stamp set, some circles using white and gold acrylics & pen cap. Once the base was ready punched the sides & using a craft scissor gave a wavy pattern to the sides. Then arranged the patterned papers. To match with 2-0-1-6 challenge at Lulupu I added 6 patterned papers one in floral print at the either sides, two around the black photo sheet & other two at the top (& the one in pink is the same as used around the photo sheet) and the base pink patterned sheet.


These pretty roses were fussy cut & slightly curved to give them a real look.

I loved these pretty pink hearts made with glittery foam sheet. Added some purple rhinestones here & there.
Sentiment is hand written!
I hope you like my layout. Do tell me, I love to read your comments :)
Thanks for visiting! Have a Great day!

Linking to

Lulupu challenge Recipe 2-0-1-6
2- flowers
0- washi tapes
1- stamp set (Bo Bunny music notes)
6- patterned papers


Thursday, 28 January 2016

Pretty Vintage Box Tutorial

Hello Friends!

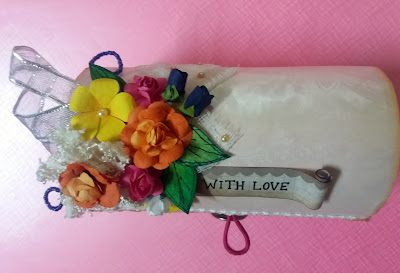
A new post to share today, a vintage look box. I have re-cycled "something" to make this, to know what is that "something" wait and see :) 

I rubbed some DI to the laces and at the edges of the box to give it a nice look. My box has feet also made of bottle caps!


Top embellished with handmade flowers, leaves, laces and pearls. I adhered some cheese cloth & scraps of laces to prepare the base for my flowers and to add texture.


 Here is how it opens


It can be used to keep bangles, goggles or any other goodies :)
So what is that something?? Any guess?? 
Well its a plastic bottle!!

Here is the tutorial how it turned out,
I took a cold drink bottle for this and removed the top and bottom part to get a hollow cylindrical portion.

Using the bottom part drew two circle onto the cardboard & cut them.


Cut the bottle horizontally and stuck them together using a brown tape. This is done to create a flexible opening. Now close and check, the top lid portion should be just enough to cover the bottom part, if its bigger cut the lid portion horizontally again.


Now cover the inner portion using a patterned paper using brown tape. Don't glue it tightly as the box need some flexibility to open and close. Paper should be little bigger than the size of the bottle, around 1 inches extra on both the sides.


Cut the paper at the sides as shown below.


Glue the paper sides to the circles.


Similarly cover the exterior portion of the bottle with another patterned paper. Cover the circles at the sides also. . Make a small hole to the top part, insert the ends of the elastic through it and tie it. Use needle and thread to attach a button to the bottom part. And the box is ready to embellish!

I hope you like it! Do tell me! :)

Thanks for visiting! Have a great day!

Linking to


Wednesday, 27 January 2016

Cheer Up!

Hello Friends!
A simple CAS card to share today! Have a look


I used my new stencil set from craftslane to make these pretty butterflies. For the background I used pigment ink and broken china DI. Added tiny dots using black marker. 
Hope you like it, Do tell me :)

Thanks for visiting! Have a great day!

Linking to
Craft Rocket challenges (CAS)
ICRCPREWIN03 ~ CAS Challenge with Something NEW


Tuesday, 26 January 2016

Fun with Pastels!

Hello Everyone!!
January is coming to an end & it seems to pass so quickly! I am running short of time since I have so many projects to share which are still pending! 
So here is a colourful card to share,


This is my first time I used inks, pastels, stencils and some doodling, while making this card. And a new pretty "Smile" puff sticker!
I started with a white card stock & stenciled some designs using pigment ink. Then rubbed oil pastels all over using my fingers to blend the colours. The fun part was when the stenciled design started changing its colour due to the effect of pastels, & i loved the mixed shades! Hearts & bubbles were doodled using pastels & white signo gel pen. Then outlined them using a black marker.
Created few more patterns in the background using pastels and finally some inking at the edges of the card. That was all & it was ready in half an hour :) I was happy with the end result since I had no idea what it will end up with when I started without any planning!
I hope you like it. Do share :)
Thanks for visiting! Have a great day!

Linking to
All Sorts challenge (Valentines Day)
Simon Says Stamp Monday challenge (Love is in the air+red)
Mod Squad challenge (Love is in the air)
Peek-a-boo designs (Ag+Indian flag colours any three) (I used saffron, blue & white)


Thursday, 14 January 2016

Family Card

Hello friends, sharing a quick post. 

It's a card based on family theme. The family scene is painted using water colours & acrylics. It's a free hand drawing! 


I used a floral pattern paper for the background. At the right corner there is a tiny stamped butterfly with a rose & hanging beads.


Added a lace border with pearls.My handmade paper roses and leaves with ribbon loops.

Hope you like it!!
Let me know :)

Linking to
All sorts challenge ( Ribbon & lace)
Crafty Hazelnuts Patterned Paper (Pattern papers)


Sunday, 10 January 2016

It's a Blue!

Hello Friends,
Wishing you all a happy & creative year ahead! 
Today I have a mixed media project to share with you all. I experimented with lots of things while making this project. I choose blue  colour as the main theme & started to incorporate all blue elements in it. 
Enjoy the pics


It's me in the pic! Yes it is my childhood pic & there is a small tale behind it. I was very fond of wearing my father's goggles & I used to lift up my face so as to prevent the goggles from dropping down because they were too big for my face! :)


My first experiment was with the blue flowers. I love my handmade blooms, aren't these looking pretty?
The base is an old wooden frame recycled to create this. For the background I used some papers from an old novel & stamped it with my new Bo Bunny "It is written" stamp, and adhered a fabric piece of a blue old denim jeans with some stitching on it.
For the frame I used my homemade spray paints & mists in pearl & metallic shades, to get a shinny look.


I hope you like it! Do tell me, I love to read your comments:) 
Create & have fun!
Thanks for stopping by!

Linking to
More Mixed Media Challenge (Blue)

Peek-a-boo Designs (colours saffron, white, green & blue & stamp)
Rhedd's Creative Spirit (Altered art, mixed media)
Anything but cute challenge (Ring out the old, bring in the new)
A bit more time to craft (AG)
Craft your passion challenge (AG)
Simon says stamp Wednesday challenge blog (Something new)
Simon says stamp Monday challenge (Something new)
Double "D" Challenge (Inspiration Tile)


Stamps and stencils (Blue)

You may also like.