Sunday, 30 August 2015

Baby Album

Hello Everyone!! J

A new post after a long break…actually a heavy post!! Since it has lot of memories to share. It’s a baby album!! To capture and preserve sweet memories of a new born.
And another twist with this album is that it is an altered project so find what it is..!!

I have tried to make each and every page interesting and all this took a lot of time but then since it is related to a baby there were many thoughts related to baby’s activities, so I have tried to incorporate them.

This album is not made specifically for a boy or a girl so it can be used for either of them J
Baby Album


The texture on top cover is created using tissue papers, gesso, inks & acrylics. Pink ribbon blooms on side border are handmade. Small pearls are made using dimensional liquid pearls (Ranger).
Pics for all pages are taken separately for better visibility.


Blank spaces on pages is for pics (All 4*6 inches)


On opening it looks like this..

Baby Album


Birth date is to be highlighted.

Hope you enjoyed it!! :)
So the twist for this album was done with this..

A packaging material!! :)

Thanks for visiting :)
Have a great day!!

Entering in following challenges:

Bingo (brads/eyelets + ribbon + punch)


Saturday, 22 August 2015

Evergreen Bouquet

Hello Everyone :)
My today's project is inspired by this month's Hobby Mela's Challenge, where the theme is on Bouquet Arrangement.
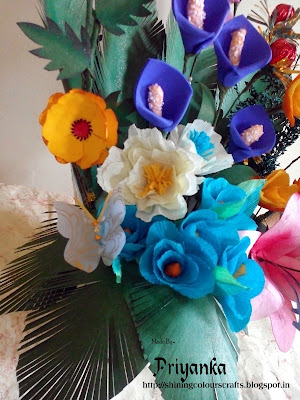
So here is my Evergreen Bouquet which is completely handmade!!


Evergreen Bouquet

I started with the basket first, which is made up of cardboard planks. Glued them together to form a basket & covered it with large pieces of textured paper bits (sky blue colour). Then did some sponging in some areas using green ink. Finally added a border of thin fibre rope at the base of the basket. Using aluminium wire made an arch above the basket & covered it with green floral tape.

For the yellow flowers on arch, I die cut few paper flowers, inked their edges using red ink and emboss around the edge of the petal to give it a nice shape. Then layered up two flowers to give it some puffy look & added a punch craft shape at the centre. Leaves are all hand cut & inked. Arranged all the flowers & leaves on a thin copper wire covered with floral tape and wrapped the wire on the arch.


For the Purple cala lilies I cut few hearts of foam sheet. For the centre I wrapped some cotton on the wire & covered it with orange glue then sprinkled some fine thermocol over it. Then placed the wire on the inverted heart & glued it using fevi kwick giving it a nice shape.

Purple-pink flowers on the other side of the arch are also made with foam sheet (purple portion) & crepe paper (pink portion & yellow fringe).

Small blue and yellow blooms & white flowers are made up of crepe paper.

For the pink lilies visit this link on my blog for complete tutorial

For the chocolates I wrapped them in red shimmery wrapping paper added some golden fringe around it & a small green paper base, then stuck it onto the wire to make stem.

Finally added some long paper leaves at the back of the bouquet, and few smaller ones near blue blooms. Then tied a ribbon and a small bird on the arch & glued a butterfly on the flower. Added two long stems with pearls & pink roses at the back which are made up of organdie fabric.  

Hope you like it!! Do tell me how it is :)
Thanks for visiting!!
Have a wonderful day!!

Friday, 21 August 2015

Watercolour Card

Hello Everyone :)
Sharing a quick post today!! A card made with different watercolour techniques.

Inspiration to make this card was by Gayatri Murali for Create Something Catchy.

& here is my card


The background & the flowers both are made using watercolours & inks.

Hope you like it!!
Do tell me :)
Thanks for stopping by!!

Entering in catchy challenges


Wednesday, 19 August 2015

Altered Gift Box

Hello Everyone 

Today I have an altered project to share with you all. I have to make something for my two close friends, a lovely couple; for their first wedding anniversary!! I want to give it both masculine as well as feminine look so I decided to do something dark & bright together. I want to add a small card, a photo frame, & then something 3 dimensional, so to incorporate all the elements I decided to go with a box & came up with this Altered Box Project!! It was an Ariel Matic (detergent powder) box!! 
So have a look..
Altered Gift Box

I started with the photo frame first & selected some thick card stock then did some sponging with black ink in some areas.
Altered Gift Box

This vintage look lamp post is made up of paper! Yes it is totally handmade!! Also that small bench is made up of thick brown sheets. For the floor I used corrugated paper. Added some bright small flowers & butterfly around the sentiment.

For one side of the box I used paper dolly as a base & stuck some few painted dry leaves. Fence is made up of ice cream sticks.
Altered Gift Box

This side is kept simple with a stamp design at the corner & a small message.
Altered Gift Box

Here is the back side of the box. A plastic wire mesh is used to make the top border, my handmade birdie & a small stamp sticker (that black & white one).


For the top I made this small easel card & added some handmade flowers.
Hope you like it!! Do tell me J It’s always so encouraging to read all your comments & it gives me a reason to visit your blog too!!


Thanks for visiting!! Happy crafting!!

Entering in following challenge:
http://craftyourpassionchallenges.blogspot.in/2015/08/chalenge-275-always-anything-goes.html


Monday, 10 August 2015

Lovely Lilies

Hello friends!! :)
Hope you all are well. I am very excited to share my paper lily flowers today. These were on my mind from a long time & finally I gave a try & it came out well. I really enjoyed making these flowers.
Have a look..


Lovely Lilies


Lovely Lilies

Aren't these blooms looking pretty? :) I just loved them.


Here is the tutorial:
Cut out 6 long petals out of light colour handmade sheet.


At one end of the petal make a small cut around 1 cm to make a small slit.

Fold the petal vertically into half.

Rub the folded edge on the ink pad & immediately dip into water. Gently dab the ink all over the petal using fingers & thumb so that the ink distributes evenly.


Keep them between paper napkin to absorb excess water.

Leave them to dry out completely or blow dry.
Glue two ends of the slit together. Make a small hole on the crossed slits just enough to move the petal through the wire.
Curl the other end slightly using scissors. 


Cut 5 long stamens out of black sheet. Take a thin copper wire & make a loop at its one end. Glue all the stamens one by one onto the loop. 
Slide 3 petals onto the wire & glue them. Then slide last 3 petals & glue them. Cover the wire using green tape.
Cut out some leaves out of green colour paper & curl them using scissors. Glue them onto the stem using green tape.


And the flower is ready!!
Hope you enjoyed it!!
Do tell me how it is :)

Thanks for visiting!!

Entering in Catchy Challenges


Monday, 3 August 2015

Shabby Chic Birthday Card

Hello Everyone :)
This time I want to try something on shabby chic so decided to make a card!!
Shabby Chic Birthday Card

Here I am sharing how it came out.


Shabby Chic Birthday Card

All I started with a thick pink sheet whose edges were rubbed using sand paper to give it a wear-tear effect, & then inked the edges. One end was slightly twisted to give it a fold.
Glued some soft foam between white & pink sheet. Then stamped few designs using stencils.
Stuck some white lace & created a tear effect in the red sheet so as to give it a torn out look. You could see that white lace looking out of the red sheet.
Shabby Chic Birthday Card

For the flowers, the yellow ones were created using punches while others were hand-cut & then inked.
Added black laces with some silver glitter & dull white satin ribbon at the bottom left of the card.
Stuck a garden picture from my old card stock & lastly added the handwritten sentiment.
Shabby Chic Birthday Card

Here the card opens..


With a Pop up cake !!

Also I made a simple cardboard box for storing this card safely, have a look on it..


Hope you liked it :) Do tell me how it was :)
Thank you for visiting my blog!!

Happy Crafting!! :)


You may also like.